 Afrixi
Last Updated : January, 2019
Table of Content
- About Netlify CMS:
- Installing and configuring Netlify CMS:
- Step 1. Creating the admin files
- Step 2. Configuring config.yml file
- Step 3. Specifying collections in config.yml file
- Step 4. Setup on Netlify
- Step 5. Enable Identity and Git Gateway
- Step 6. Add the Netlify Identity Widget
- Step 7. Accessing the CMS
- Summing Up
About Netlify CMS:
Netlify CMS is an open source content management system for your Git workflow that enables you to provide editors with friendly UI and intuitive workflow. You can use it with any static site generator to create faster, more flexible web projects. Content is stored in your Git repository alongside your code for easier versioning, multi-channel publishing, and the option to handle content updates directly in Git.
Installing and configuring Netlify CMS:
In this guide I am going to show you how to setup Netlify CMS on a Hugo based site. We will be hosting the website on GitHub and Netlify. The **prerequisites **for the next steps are:
- A Hugo website/blog
- GitHub account and basic usage
- A Netlify Account
Note: The theme of your website should only be installed using the
git submodule addcommand. For more info read this.
If you don’t want the to get your hands dirty with some coding then you can simply clone this repository (of my blog), configure the theme and then proceed to the Step 4. Also make sure you delete the content in /content/post and /static/images/uploads/, make changes in the config.toml file before proceeding to Step 4. Delete the contents of /content/post before using as boilerplate. Also delete the AdSense ad code in /themes/hugo-tranquilpeak-theme/layouts/partials/footer.html and /themes/hugo-tranquilpeak-theme/layouts/partials/post/header.html and delete / change the Google Analytics tracking ID in the /config.toml file. Please also delete manifest.json, OneSignalSDKWorker.js, OneSignalSDKUpdaterWorker.js and the folder __MACOSX located in /static.
Step 1. Creating the admin files
All Netlify CMS files are contained in a static admin folder, stored at the root of your published site. The static files of a Hugo site are stored inside the /static location at the root of your website.
Navigate to static of your website and create a folder named admin inside it. If there is no static folder in your website then simply create a new folder and name it.
The admin folder of Netlify CMS contains two files:
admin

├ index.html

└ config.yml
Let us first create the file index.html inside the admin folder The content of this file will be:
<!doctype html>
<html>
<head>
  <meta charset="utf-8" />
  <meta name="viewport" content="width=device-width, initial-scale=1.0" />
  <title>Content Manager</title>

  <!-- Include the styles for the Netlify CMS UI, after your own styles -->
  <link rel="stylesheet" href="https://unpkg.com/netlify-cms@^1.0.0/dist/cms.css" />

</head>
<body>
  <!-- Include the script that builds the page and powers Netlify CMS -->
  <script src="https://unpkg.com/netlify-cms@^1.0.0/dist/cms.js"></script>
</body>
</html>
This file allows us to access the admin panel for our website. You will be accessing your admin panel at yourwebsite.com/admin. This file loads up the required script and CSS for Netlify CMS.
In the next file we will configure our Netlify CMS installation. Create a file named config.yml at /static/admin and proceed to the next step.
Step 2. Configuring config.yml file
Configuring this file depends a lot on your site. The common configurations for each website are described below. Since we are using Netlify and GitHub for hosting our website so enter this in your file:
backend:
  name: git-gateway
  branch: master # Branch to update (optional; defaults to master)
You have the option to enable the Editorial Workflow, which adds an interface for drafting, reviewing, and approving posts. To do this, add the following line to your config.yml:
publish_mode: editorial_workflow
Next we are going to specify the locations where Netlify CMS will store the images you upload to your blog. I wish to store the files in static/images/uploads folder of my website and make them available in the published website at /images/uploads.
While media_folder specifies where uploaded files will be saved in the repo, public_folder indicates where they can be found in the published site. Depending upon your requirements you may edit the code:
media_folder: "static/images/uploads" # Media files will be stored in the repo under static/images/uploads
public_folder: "/images/uploads" # The src attribute for uploaded media will begin with /images/uploads
Note: If
public_folderis not set, Netlify CMS will default to the same value asmedia_folder, adding an opening / if one is not included.
Next comes the tricky part of the configurations….
Step 3. Specifying collections in config.yml file
Collections define the structure for the different content types on your static site. Since every site is different, the collections settings will be very different from one site to the next.
I wanted my website to have these options while creating a post: Title, Publish Date, Draft, Categories, Tags, Keywords, Auto Thumbnail Image Option, Thumbnail Image, Cover Image and Body
If you wish to have the same for your website then proceed further otherwise visit the Netlify CMS docs for
Collectionson this link. There you will find all the explanation and stuff for this step.
Enter these lines to your code in the config.yml file:
collections:

  - name: "posts" # Used in routes, e.g., /admin/collections/blog

    label: "Post" # Used in the UI

    folder: "content/post" # The path to the folder where the documents are stored

    create: true # Allow users to create new documents in this collection

    slug: "{{slug}}" # Filename template, e.g., YYYY-MM-DD-title.md

    fields: # The fields for each document, usually in front matter

      - label: "Title"
        name: "title"
        widget: "string"

      - label: "Publish Date"
        name: "date"
        required: false
        widget: "datetime"

      - label: "Draft"
        name: "draft"
        required: false
        widget: "boolean"
        default: true

      - label: "Categories"
        name: "categories"
        required: false
        widget: "list"

      - label: "Tags"
        name: "tags"
        required: false
        widget: "list"

      - label: "Keywords"
        name: "keywords"
        required: false
        widget: "list"

      - label: "Auto Thumbnail Image"
        name: "autoThumbnailImage"
        required: false
        widget: "boolean"
        default: true

      - label: "Thumbnail Image Position"
        name: "thumbnailImagePosition"
        required: false
        widget: "select"
        options: ["left", "top", "right"]

      - label: "Thumbnail Image"
        name: "thumbnailImage"
        required: false
        widget: "image"

      - label: "Cover Image"
        name: "coverImage"
        required: false
        widget: "image"

      - label: "Body"
        name: "body"
        widget: "markdown"
Step 4. Setup on Netlify
Before we push our code to GitHub and Netlify we need to make another configuration. We need to specify the Hugo Version which should be used by Netlify to generate the website. To do so, at the root of your website’s create a new file named netlify.toml with content:
[build.environment] HUGO_VERSION = "0.33"
Upload all the code of your website on a repository on GitHub.
Login to your Netlify Account. Click on New Site from Git. Now choose GitHub. Netlify will now ask for permission, allow by clicking on Authorize Application. On the next screen choose the repository to which you uploaded the code of your website. On the next screen you will see something like this:
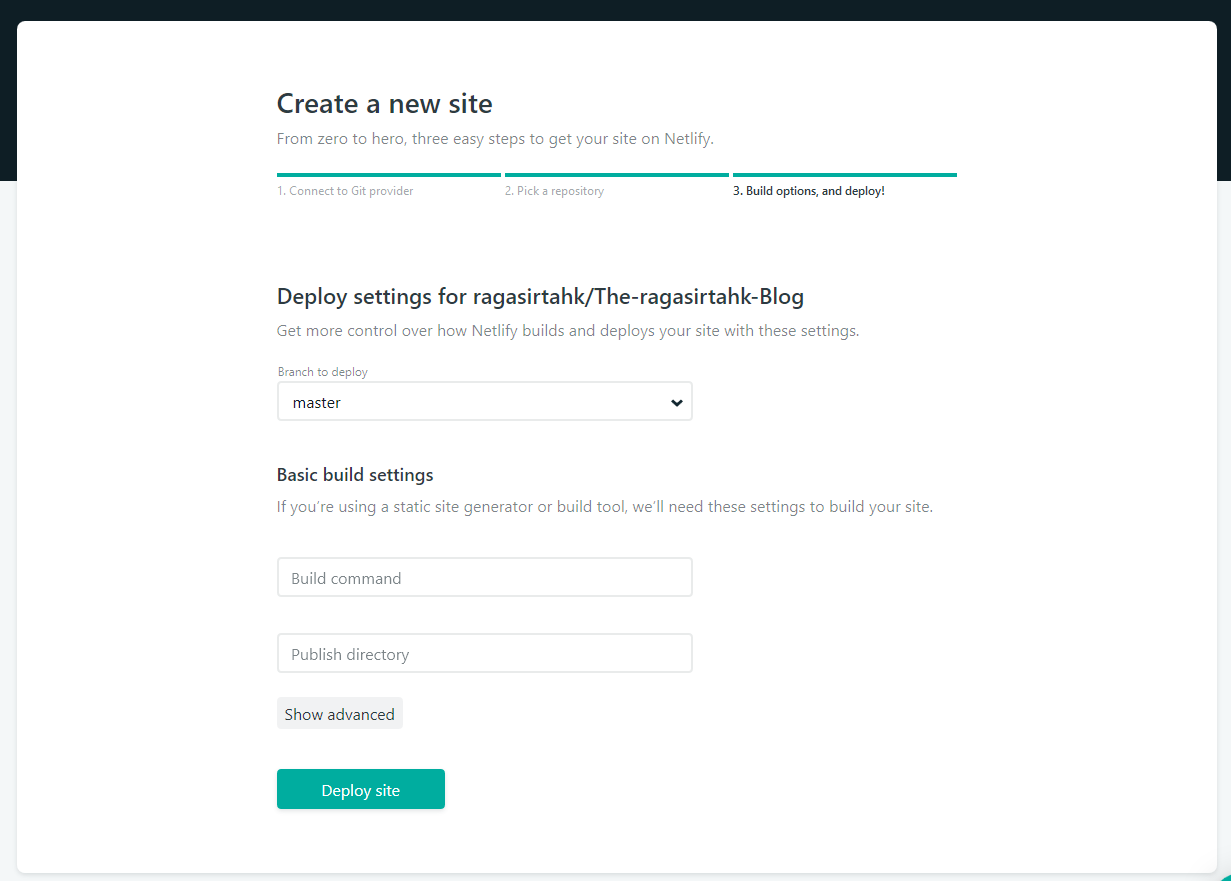
Write hugo in the Build command field. For the Publish directory field you need to know where Hugo build and saves your website, the default is public/, write the location in this field. Click Deploy site. Netlify will publish the contents of the Publish directory online after executing the Build command.
The website has now been setup on Netlify.
You may configure your Netlify website further by viewing the Netlify docs.
Step 5. Enable Identity and Git Gateway
For this step please follow the steps described in this guide.
Step 6. Add the Netlify Identity Widget
Use the Netlify’s snippet injection feature and add this code before </head>:
<script src="https://identity.netlify.com/v1/netlify-identity-widget.js"></script>
Add this before </body>:
<script>
  if (window.netlifyIdentity) {
    window.netlifyIdentity.on("init", user => {
      if (!user) {
        window.netlifyIdentity.on("login", () => {
          document.location.href = "/admin/";
        });
      }
    });
  }
</script>
The guide for using this feature is available here.
Step 7. Accessing the CMS
You might have receieved an email saying “You’ve been invited to join xyz” from the email: no-reply@netlify.com. If you did not receive the email then you need to invite yourself to access the CMS.
To do this, select the Identity tab from your site dashboard, and then select the Invite users button. Invited users will receive an email invitation with a confirmation link. Clicking the link will take you to your site with a login prompt.
If you left your site registration open, or for return visits after comfirming an email invitation, you can access your site’s CMS at yoursite.com/admin/.
Summing Up
So in this guide I have explained you how to setup Netlify CMS on Hugo and host in on Netlify and GitHub.
You can view the code of this whole blog in this GitHub repository.
If you have any queries or suggestions, I will love to hear them in the comments box below.